

- As a working directory we use the tmp directory on the C:\ drive
- The OpenSSL Bibleothek is needed. Download (openssl-0.9.8h-1-bin.zip)

- The OpenVPN client package from the IPFire Server
C:\
   tmp
      bin
      share
      man
      contrib
manifestC:\
tmp
bin
share
man
contrib
manifest
cert
example.ovpn
example.p12After you have downloaded OpenSSL and have unpacked under tmp, you should find the right directory structure.
Next, we put in the tmp directory to another directory name cert. In this directory, we extract the contents of the client packet. The new directory structure should now be constructed as shown on the right.
The file name of the client package can differ and should be adjusted accordingly from you.
When all the files are there, we open the command prompt and define first the following command to the file name in this example example.p12.
set cert=example.p12
The following commands split the p12 file into 3 separate files, with which we create our final ovpn file at the end. The commands must be listed consecutively as always asked for the password to decrypt. This is the same password that is also used to connect to the IPFire.
C:\tmp\bin\openssl.exe pkcs12 -in C:\tmp\cert\%cert% -clcerts -nokeys -nodes -out C:\tmp\cert\cert.txt
C:\tmp\bin\openssl.exe pkcs12 -in C:\tmp\cert\%cert% -nocerts -nodes -out C:\tmp\cert\key.txt
C:\tmp\bin\openssl.exe pkcs12 -in C:\tmp\cert\%cert% -cacerts -nodes -out C:\tmp\cert\ca.txt
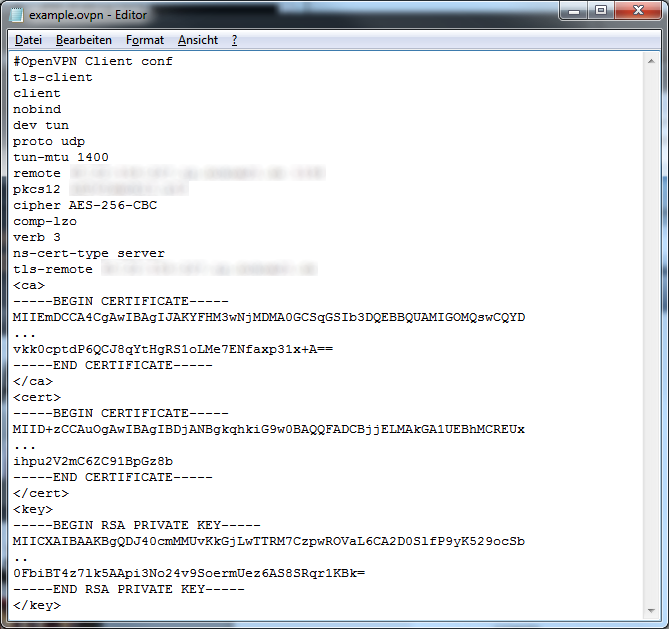
Final example.ovpn file
When all the files are created, we come to put together the final ovpn file. Example.ovpn be in the file at the end of three new areas are created.
- <ca>
</ca> - <cert>
</cert> - <key>
</ke>
Als erstes öffnen wir uns die Datei ca.txt und makieren uns die Stelle von -----BEGIN CERTIFICATE----- bis -----END CERTIFICATE----- wie in der Abbildung (Folgenden Inhalt von ca.txt kopieren) zu sehen ist. Denn makierten Inhalt fügen wir inmitten des zuvor angelegten Bereichs <ca></ca> ein.
Weiter geht es mit der Datei cert.txt, die genau gleich behandelt wird. Einziger unterschied ist das hier der Bereicht <cert></cert> zum einfügen gentuzt wird.
Zum Schluss kommt die Datei key.txt an die Reihe, die wie die beiden zuvor beschriebenen Dateien behandelt werden. Zu beachten ist das der Bereich <key></key> zum einfügen genutz wird, sowie der von -----BEGIN RSA PRIVATE KEY----- bis -----END RSA PRIVATE KEY----- markiert werden muss siehe Abbildung (Folgenden Inhalt von key.txt kopieren).
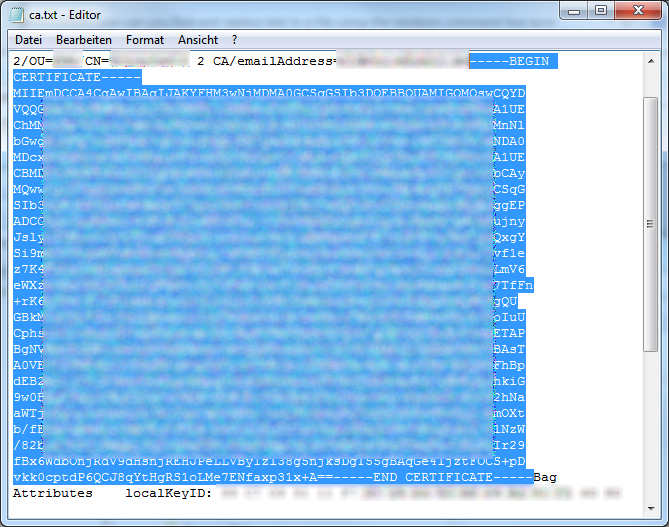
Folgenden Inhalt von ca.txt
kopieren
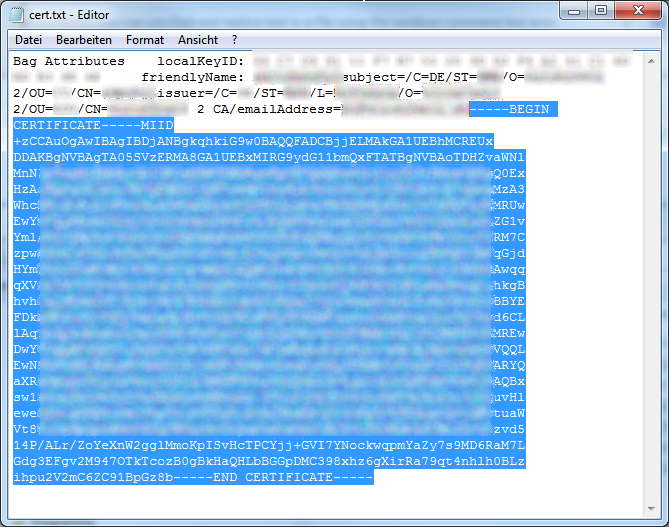
Folgenden Inhalt von cert.txt
kopieren
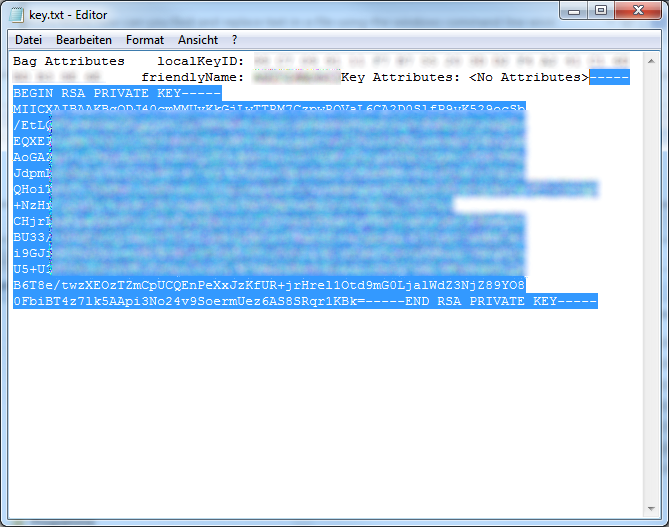
Folgenden Inhalt von key.txt
kopieren
Damit sind wir hier fertig und die ovpn Datei kann auf das entsprechende IOS Geärt übertragen werden. Es können alle Apps genutzt werden aus der andere Apps heraus geöffnet werden kann z.B. die Apps Mail, ownCloud oder Dropbox.